Saturday, 19 November 2016

Stunning Stud Embellished Candle Centre Piece


 This is a very easy way to make an original & striking candle centrepiece


Preparation

Choose a nail head with prong backs & diamante set in metal claw backs.
Select your candle & satin ribbons in complimentary colours.


Guide


  1. Using the candle as the base, simply push the prongs of the nail heads and claws of the diamante securely into the wax
  2. Following the top rim of the candle create one row of alternating nail heads & diamante
  3. Measure a strip of 15mm satin ribbon around your ribbon. Apply double sided tape to the reverse & cut the ribbon to length adding a 1cm overlap for the join
  4. Repeat the above step using 7mm ribbon in an alternating complimentary colour, making sure that the seams line up
  5. Repeat step 2 following the edge of the ribbon to achieve a straight line
  6. Add one row of square nail heads leaving a small gap between each
  7. Repeat step 4 using the edge of the square nail heads as a line guide
  8. Starting from the bottom of the candle, repeat steps 1-7 again until you have two equally sized/spaced blocks of embellishment with a large gap in the centre
  9. Select a wide satin ribbon and tie in a decorative bow. Snip the ends into points using a sharp pair of scissors


Tip: If you wish to create a distinct pattern, score the design into the wax with a pin before you start.

Products Information

Jr05370 Gilt SquareBrushed Nail Heads.
Jr05422 Gilt Seed PodRound Nail Heads


Sunday, 13 November 2016

Craft Cheats Beautiful Beaded Napkin Rings

Preparation
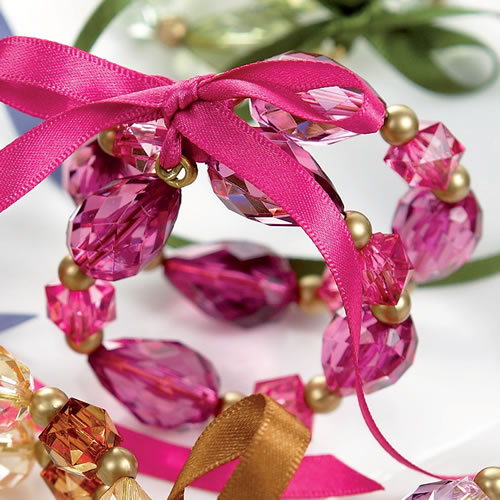
  1. Choose one of the colour combinations from our beautiful collection of pre-beaded wires. These cheap & cheerful pre-beaded wires can be used as bag handles, curtain tiebacks, jewellery… the choice is yours!
  2. Choose any ribbon that is approximately 7mm wide. Cut ribbon to approx 30cm
Start
  1. Bend the wire twice round into a circle so that the end loops are in line with each other with one small matte gold bead in-between
  2. Using a pair of round nosed pliers, slightly open the end loops out enough to easily thread through your ribbon of choice
  3. Thread the ribbon upwards through the bottom loop over the back of the matt gold bead. Then bring the ribbon down over the front & twist back around the reverse of the bead & then up again through the top loop
  4. Bring the ends of the ribbon together at the front of your napkin ring & tie into a decorative bow. Snip the ends of the ribbon to tidy up any fraying
Tip: I have teamed together complimentary ribbons to match the colour of the beads. You could try using contrasting colours for a whole different effect. Red ribbon on green beaded napkin rings would look fab on the Xmas table!

Products Used

Jr01812 Peach & Topaz Beaded Wire £1.90 each
Jr01813 Grey & Topaz Beaded Wire £1.90 each
Jr01814 Olive Beaded Wire £1.90 each
Jr01813 AmethystBeaded Wire £1.90 each

Jr03857 Blackberry Satin Ribbon. 7mm £0.21 per metre
Jr03863 Moonlight Satin Ribbon. 7mm £0.21 per metre
Jr03845 Cypress Satin Ribbon. 7mm £0.21 per metre
Jr03824 Sable SatinRibbon. 7mm 0.21 per metre

Sunday, 16 October 2016

How to Make a Halloween Trick or Treat Candy Collection Tub

Who says Halloween can't be glam?
Read our step by step guide how to make this super cute trick or treat candy collecting tub.


Preparation

Sandwich back-to-back, sparkly side out, 2 sheets of A4 orange & black glitter fabric. Glue in place.

With a standard hole punch, cut out one row of holes along one long edge. This will form the rim of your tub, where you thread the ribbons through.

Cut a mixture of orange, black, purple & green ribbons to different lengths.

Thread decorative beads onto a piece of strong malleable wire to make a handle.

On the reverse of a piece of glitter fabric draw a circle using a compass set at 57.10mm mm radius. Cut the circle out of the fabric with a pair of sharp scissors. Draw another circle in the middle - compass setting: 47.10mm. Now, at 1cm intervals cut from the outside edge inwards to the inner circle/line creating a fringe. This will form the base of your bucket.

Start

Glue our black distressed lace trimming around the long edge of the glitter fabric sandwich which has the holes

Tie the contrasting ribbons through the holes & knot in place.

Bend the fabric round so that the ends butt together to create a cylinder shape. Glue into place and cover join with a piece of decorative ribbon

Now slide the base into place & fold the cut sections up onto the inside cylinder walls. Glue in place.

Thread the handle through opposite points of the ribbon rim and tie in place.

Finish the rim off with a row of black & white strung sequin. Glue in place.

Top off with an oversized orange plastic button


Tip: It doesn’t matter if the ribbons fray – this will add to the look!
All items available from JosyRose.com


Monday, 22 February 2016

Make for Mum: Habby Necklace

Mother's Day is fast approaching. What better way to say 'i love you' to your Mum this year, by creating her this unique necklace, tailoring the fabrics, colours and beads all to your Mum's personal tastes. 

Here's How:

Cut out your desired collar shape from a sturdy felt.

Choose a collection of clear acrylic stones in a selection of shapes. Cover them with a thin chiffon material, so you can still see the facets of the gems. Gather the fabric at the back of the gem and tack it together. 

Sew the fabric covered stones onto your felt collar. Position them so that they sit slightly higher than the top edge of the collar to hide the felt.

Line up a string of multi-coloured beads made from precious stones along the bottom edge of the collar. Tack the string to the collar every 3 beads.

Fill in the gaps between the gems and beads with sew-on genuine crystal diamanté stones in clasps.


Measure a strip of black grosgrain ribbon to the length you wish your necklace to be. Cut it in half and stitch one end of each strip to the back of each tip to create the 'chain'.

Slot a ribbon end clasp onto the tip of each ribbon and close in place with a pair of jewellery pliers. Finish off with a screw clasp.


Monday, 8 February 2016

Butterfly Kisses

Create the base. Cover a haberdashery hoop with ribbon. If you don't have one you could make a hoop shape from thick wire, such as a coat hanger. Then, using sticky tape, secure a length of chunky piping cord along the wire to thicken it up. Wrap the ribbon around the hoop until it is completely covered, making sure that the ends meet at the top. I've used JR05207, a beautiful embellished sequin chiffon ribbon, adorned with intricate sequin flowers.

Now for the fun bit! Thread a selection of buttons, beads and diamanté onto some coloured craft wire. Wrap the decorated wire around the hoop. Tie a swatch ribbon in a simple knot to the top right. Add a sequin butterfly to the bottom right-hand side of the hoop and arrange a bouquet of diamanté buttons and flowers next to it, creating the main focal point.

To finish off, make a wire hanger, decorated with a range of beautiful beads. Wrap it round the top of the hoop and finish the other end with a simple finger loop.  Add a tassel to the top center. To finish, glue a blue chiffon flower at the front to hide the seams of the ribbon.
Products Used:
  • Chiffon Embellished Ribbon (Jr05207)
  • Butterfly brooch (Jr01171)
  • Daisies, pink, blue, green (Jr01652/54/55)
  • Diamanté Button (Jr04862)
  • Beads (Jr05087, Jr04848, Jr04847)
  • Buttons

Sunday, 10 January 2016

Sweet Dreams Eye Mask


Step 1: Cut Out Felt Pieces
  • baby blue felt – mask shape x2 
  • light grey felt – cloud shape x1
  • white felt  – smaller cloud shape x1
  • light grey felt – oval face shape x1
  • white felt  – smaller oval face shape x1
Step 2: Make the Clouds Sleepy Face
  • Draw two small ‘U’ shaped eyes & a larger ‘U’ shaped mouth onto the white felt face.
  • Thread black embroidery thread onto a wide eyed needle.
  • Beginning from the top right hand corner start stitching the right hand eye using a running stitch technique.
  • Once you have got to the top left of the right eye, turn back and fill in the running stitch gaps until you are back at the top right. You will now have a sold ‘U’ shaped sleepy eye.
  • Now work your way back around to create the eyelashes.
  • Repeat the step above for the opposite eye.
  • Now, create a solid running stitch smile.


  • Sandwich the white and grey face together using a light blue embroidery thread in an open running stitch around the edge.
  • Glue a white marabou feather to the reverse.


Step 3: Make the Cloud

  • Sandwich the white and grey cloud shaped felt pieces together using a light blue embroidery thread open running stitch.
  • When you get to the bottom three curves of the cloud, insert the clear tear drop fringing, in sections of three and tack in place by continuing the open running stitch around the edge.


  • Select a colour-coordinated button and sew onto two circular layers of felt in increasing sizes and stitch into one of the clouds curves.
  • Repeat twice for the other two cloud curves.


Step 4: The Mask
  • Line up the blue mask pieces on top of each other with a thin piece of wadding in the middle.
  • Starting from the top middle, blanket stitch around the edge with a white embroidery thread.
  • Once you get to the sides, sandwich the polka dot satin ribbon between the templates and tack in place using a running stitch. Once you have stitched the width of the ribbon, continue blanket stitching around the edge of the mask 


Step 5: Finishing Off

  • Tack the centre of the cloud onto the mask. Glue the face onto to hide the tack stitch.
  • Finish off by hot-fixing a few clear crystal diamanté onto the cloud for extra sparkle and add two rose pink diamanté to the face for the rosy cheeks.


Products Used:

JR00600
Pk 20 Marabout Feathers - White
1
£2.79
JR03989
Polka Dot Satin Ribbon - Cornflower 25mm
1
£0.61
JR00942
Embroidery Thread Skein - Black
1
£0.29
JR00941
Embroidery Thread Skein - Lt. Silver Grey
1
£0.29
JR00943
Embroidery Thread Skein - White
1
£0.29
JR00006
Tear Drop Fringing. 39mm - Clear
1
£4.99
JR00870
Pk 10 Fish Eyes Buttons. 11mm – Baby Blue
1
£0.25
JR02058
Filigree button. 18mm - White
1
£0.35
JR02019
Daisy button. 15mm - Natural MOP
1
£0.75
JR05515
Craft Felt Sheet. 9”x12” - White
1
£0.55
JR05522
Craft Felt Sheet. 9”x12” – Baby Blue
1
£0.55
JR05529
Craft Felt Sheet. 9”x12” – Silver Grey
1
£0.55
JR02291
50 Diamante. Hot fix. Size 4mm/ss16 - Rose
1
£1.71
JR02310
50 Diamante. Hot fix. Size 5mm/ss20 - Crystal
1
£1.66
JR02236
Kandi kane hot fix wand.
1
£14.99

Monday, 7 December 2015

How To Make A Glitter Fabric Christmas Tree

  • Create a tree template and cut out the desired tree shape from 6 sheets of NEW A4 sticky back glitter fabric. Glitter red, silver or gold would look equally as fabulously festive as green!
  • Place 3 trees glitter side down and lay strong thick wire down the trunk and foot of each tree
  • Lay the other side of the tree on top, glitter side out, creating 3 pairs of glittery trees with the wire sandwiched between the self adhesive glitter fabric
  • Glue all 3 trees together along the centre trunks creating a rocket shape
  • Glue buttons onto the tips of the stems
  • String beads, buttons and sequins onto thin wire to create a tinsel effect and wrap around the tree
  • Finish off with diamanté button tree top and a wire hook should you want to hang the decoration up, or bigger glass beads on the feet of the tree if you want to use the tree as a table centre piece
Large Diamanté Button  / Glitter and Gem Buttons / Glue Gun / Glitter Fabric


Top Tip:
"A glue gun was vital to this project.
Make light work of tricky and time consuming applications by simply opting for our handy glue gun. Plus, if you make a mistake, the glue can usually be picked off in one chunk, and you can try again! A professional tool for all novices!"

JR Blogs

About JosyRose.com

JosyRose is an online boutique, catering for all your contemporary fashion, interior and crafty needs! We sell all the essential sparkling finishing touches you just can't seem to source on the high street. On-trend fashion motifs to funky feather trims. The perfect place to customise any hand-made project. Our collection covers haberdashery classics, craft, fashion, soft furnishings, scrapbooking, stage and jewellery making! x